Soi Fon

Soi Fon

SSR rarity
Tactic class strike type

Base Stats

HP1628
ATK335
DEF325
Crit Rate5%
Crit DMG50%

Review

Soi Fon model
Profile Update

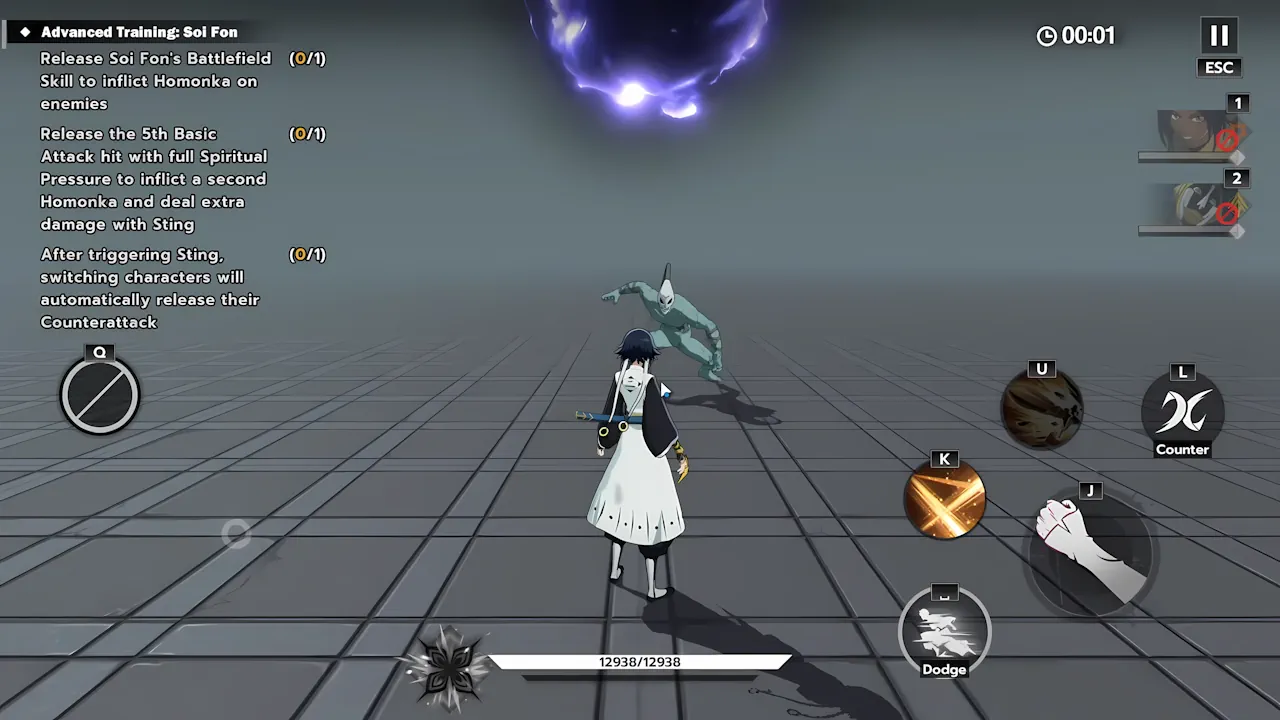
Bleach Soul Resonance’s Soi Fon finally delivers what many players expected from a real Tactical unit. Unlike characters such as Neliel or Aizen, who often feel closer to hybrid DPS units, Soi Fon is built around team rotations, Battlefield Skill management, and explosive burst windows. She is not designed to permanently stay on the field — instead, she shines by enabling devastating setups for herself and her teammates.

Her gameplay revolves around applying marks through skills and detonating them for additional Strike Damage. This creates a unique combat flow where timing and character swapping matter far more than simple button mashing. Once her Battlefield Skill is charged, she can trigger incredibly satisfying burst combos, especially when paired with characters like Yoruichi, Mayuri, or Urahara.

What truly makes Soi Fon dangerous is her Ultimate. Even at low investment, it hits extremely hard, and her first dupe (B1) dramatically improves her performance thanks to cooldown reduction and additional critical bonuses. Because of this, she feels somewhat dupe-dependent, but fortunately, her first breakthrough already provides a massive power spike.

Build-wise, players currently debate between a pure Attack-focused setup and an Ailment Damage hybrid build. Both are viable, though the current meta heavily favors Ailment Damage due to how efficiently it scales overall damage. If you lean into that direction, pairing her with Mayuri becomes extremely effective. Meanwhile, Attack-focused builds synergize better with Urahara support.

Despite her incredible potential, Soi Fon is not a beginner-friendly character. Her rotations can feel chaotic, since her gameplay constantly revolves around re-entering the field to recharge her Battlefield Skill. However, once mastered, she becomes one of the most rewarding tactical units in the game.

Recommended Weapon and Core Stamps

Weapon Stamps

Against the Restraint
Power Strike
Power Strike

Core Stamps

Punishment Force Commander's Outfit
I've Been Waiting for You

These are some recommended Weapon and Core Stamps. Here you can see a complete list for Weapon Stamps and Core Stamps. Please note that both Stamps have fixed Sub Stats and Effects.

Recommended Set Stamp

Stealth Force

Soi Fon Min Ideal Stats

  • 60% Crit rate
  • 120% Crit DMG
  • 4500 ATK
Stealth Force I

Stealth Force I

Main Basic Stat

  • Strike DMG bonus

Advanced Stats

  • Crit DMG Bonus
  • Crit Rate %
  • Ailment DMG Bonus
Stealth Force II

Stealth Force II

Main Basic Stat

  • Crit DMG Bonus

Advanced Stats

  • Crit DMG Bonus
  • Crit Rate %
  • Ailment DMG Bonus
Stealth Force III

Stealth Force III

Main Basic Stat

  • ATK %

Advanced Stats

  • Crit DMG Bonus
  • Crit Rate %
  • Ultimate Charge Rate

These are the recommended sub-stats for the character. It’s important to note that each piece comes with a fixed attribute: ATK, DEF, and HP. The only things that can vary are the primary sub-stat and the secondary sub-stats. You can view the complete list in our Stamp Set Guide.

Boundary - Ascension Progress

01

Reduces the cooldown of Ultimate by 10 seconds and increases Ultimate Energy Charge Rate by 100%. Increases Soi Fon's Crit Rate by 15%.

02

Increases All-Skill Mastery by 40%.

03

Increases skill levels by [2].

04

When any character in the team lands a critical hit, an extra Sting is triggered, dealing damage equal to 500% of Soi Fon's ATK. Cooldown: 4 seconds.

05

Increases skill levels by [2].

06

Reduces the Strike Resistance of enemies inflicted with Execution Target by an extra 20% and increases all damage they receive by 15%.

Active Skills

Flash Step icon
Dodge

Flash Step

Use Flash Step to avoid attacks right before they hit. Perfect Dodges inflict True Time Freeze for 1.5 seconds, during which Soi Fon gains 15% ASPD and 25% MSPD for 4 seconds. Cooldown: 15 seconds. Tapping Basic Attack after Soi Fon's Perfect Dodge, or her icon after a teammate's Perfect Dodge, triggers Windmill. Cooldown: 14 seconds.

Counter icon
Counter

Counter

After releasing Bakudo Number 30: Shitotsusansen to restrain the enemy, Soi Fon teleports in front of them and delivers a rapid combo, dealing damage equal to 1208% (1510% at B6) of ATK and gaining 4 points of Deathmark.

Basic Attack
Basic Attack icon
Basic Attack

Basic Attack

Soi Fon releases Hakuda in quick succession, dealing 5 for a total damage equal to 756% (945% at B5) of ATK while building her Spiritual Pressure. When releasing the 3rd and 4th hits, Soi Fon gains 1 point of Deathmark.

Time's Up icon
Basic Attack

Time's Up

Soi Fon cuts into the enemy with Suzumebachi, dealing total damage equal to 372% (465% at B5) of ATK and inflicting Homonka. If the enemy is already marked with Homonka, the attack deals 186% (232.5% at B5) of ATK as damage, consumes the mark and deals an extra 220% (275% at B5) of ATK as Sting DMG. Releasing this attack grants 1 point of Deathmark, and the first teammate switched in within 8 seconds will automatically perform their counterattack. The counterattack's damage and Spiritual Pressure Reduction Rate are reduced by 50%.

Back Strike icon
Basic Attack

Back Strike

Soi Fon teleports behind the enemy and releases a rapid combo, dealing damage equal to 126% (157.5% at B5) of ATK and gaining 4 points of Deathmark. After releasing Back Strike, tap Basic Attack to immediately release the 5th hit of the Basic Attack.

Windmill icon
Basic Attack

Windmill

Soi Fon teleports in front of the enemy and delivers a series of kicks, dealing damage equal to 126% (157.5% at B5) of ATK and gaining 4 points of Deathmark.

Technique
Execution Battle icon
Technique

Execution Battle

Soi Fon charges at the enemy and releases a dazzling barrage of attacks, dealing damage equal to 1418% (1772.5% at B5) of ATK and gaining 4 points of Deathmark. After releasing a technique, tap Basic Attack to immediately release the 5th hit of the Basic Attack.

Cleaving Throw icon
Technique

Cleaving Throw

soi-fon throws her lance at the enemy, dealing damage equal to 216% (270% at B5) of ATK and inflicting 10 Verde Rush Points.

Ultimate
Bankai: Jakuho Raikoben icon
Ultimate

Bankai: Jakuho Raikoben

Soi Fon releases her Bankai and fires the devastating Jakuho Raikoben at the enemy, dealing damage equal to 4808% (6010% at B5) of ATK.

Battlefield Skill
Stealth Force's Battle icon
Battlefield Skill

Stealth Force's Battle

While the Battlefield Skill is active, all characters in the team gain 40% increased Strike DMG. Soi Fon's Battlefield Skill uses two types of energy: Deathmark and Battlefield Skill Energy, which correspond to the two different Battlefield Skills, combo attack and Twin-Strike Execution. Soi Fon can gain Battlefield Skill Energy by consuming Deathmark. Soi Fon enters the battlefield with full Battlefield Skill Energy.

Combo Attack icon
Battlefield Skill

Combo Attack

When another teammate lands a hit, if Battlefield Skill Energy is not full, 1 point of Deathmark is automatically consumed to trigger Soi Fon's combo attack, dealing damage equal to 76% (95% at B5) of Soi Fon's ATK and granting 1 Battlefield Skill Energy.

Twin-Strike Execution icon
Battlefield Skill

Twin-Strike Execution

Soi Fon teleports to the enemy and pierces them with Suzumebachi. If the enemy is not affected by Homonka, it deals damage equal to 1510% (1887.5% at B5) of ATK and inflicts Homonka. If the enemy is already affected by Homonka, it deals damage equal to 1324% (1655% at B5) of ATK and triggers one instance of Sting equal to 220% (275% at B5) of ATK instead, while consuming Homonka. After releasing the Battlefield Skill, Soi Fon can manually release her counterattack.

Soi Fon skills

Passive Skills

Passive Group
Execution Begins icon
Core Passive

Execution Begins

When Soi Fon releases the Special Attack - Time's Up or Battlefield Skill - Twin-Strike Execution, she inflicts the enemy with Execution Target for 15 seconds. During this time, whenever the enemy is attacked by any character, an extra Sting equal to 55% of Soi Fon's ATK is triggered. Cooldown: 2 seconds. Tapping Basic Attack after Soi Fon's Perfect Dodge, or her icon after a teammate's Perfect Dodge, triggers Windmill. Cooldown: 14 seconds.

Nowhere to Escape icon
Passive Boost 1

Nowhere to Escape

Reduces the Strike Resistance of enemies inflicted with Execution Target by 20%.

Blink icon
Passive Boost 2

Blink

When any character in the team triggers a Perfect Dodge, the entire team gains 15% ATK for 25 seconds. Unstackable. This bonus is 30% for Yoruichi.

Force Tactic icon
Passive Boost 3

Force Tactic

Each time 1 point of Deathmark is consumed, the entire team gains 4% Crit DMG for 15 seconds, stacking up to 10 times. This bonus is 8% for Yoruichi.